Showing posts with label Windows Forms. Show all posts

What Is 3-Tier(Multi-Tier) Architecture And Why Do You Need It?

 
Three-tier or multi-tier architecture are often used when describing how clients connect to servers. But what does it all mean and do you need to make any changes to your existing infrastructure?
Let me try to explain this in non-technical terms (or as close to it I can get).

 1-Tier Architecture
We all know software packages like MS Access, MS Excel, QuickBooks and Peachtree just to name a few. They all have the same in common that they access files directly. This means that the file you want to work with must be accessible from a local or shared drive. This is the simplest of all the architectures but also the least secure. Since users have direct access to the files, they could accidentally move, modify or even worse delete the file by accident or on purpose.
There is also usually an issue when multiple users access the same file at the same time: In many cases only one can edit the file while others only have read-only access.
So 1-tier architecture is simple and cheap, but usually unsecured and data can easily be lost if you are not careful.


 2-Tier Architecture
This architecture is also called Client-Server architecture because of the two components: The client that runs the application and the server that handles the database back-end. When the client starts it establishes a connection to the server and communicates as needed with the server while running the client. The client computer usually can’t see the database directly and can only access the data by starting the client. This means that the data on the server is much more secure. Now users are unable to change or delete data unless they have specific user rights to do so.
The client-server solution also allows multiple users to access the database at the same time as long as they are accessing data in different parts of the database. One other huge benefit is that the server is processing data that allows the client to work on the presentation and business logic only. This mean that the client and the server is sharing the workload and by scaling the server to be more powerful than the client, you are usually able to load many clients to the server allowing more users to work on the system at the same time.


 3-Tier Architecture
This involves one more layer called the business logic tier, service tier or middle tier (layer). In the client-server solution the client was handling the business logic that makes the client “thick”. A thick client means that it requires heavy traffic with the server, thus making it difficult to use over slower network connections like Internet and Wireless (3G, Edge or Wi-Fi).
By introducing the middle layer, the client is only handling presentation logic. This means that only little communication is needed between the client and the middle tier making the client “thin” or “thinner”. An example of a thin client is an Internet browser that allows you to see and provide information fast and almost with no delay.
As more users access the system a three-tier solution is more scalable than the other solutions because you can add as many middle tiers (running on each own server) as needed to ensure good performance (N-tier or multiple-tier).
Security is also the best in the three-tier architecture because the middle layer protects the database tier.
There is one major drawback to the N-tier architecture and that is that the additional tiers increase the complexity and cost of the installation.
Take a look at the differences among these three.


Take a look at the differences among these three.
  1-Tier 2-Tier Multi-Tier
Benefits Very simpleInexpensive No server needed Good securityMore scalable Faster execution Exceptional securityFastest execution “Thin” client
Very scalable
Issues Poor securityMulti user issues More costlyMore complex “Thick” client Very costlyVery complex
Users Usually 1 (or a few) 2-100 50-2000 (+)


Add Controls Dynamically WinForms WindowsFroms C# VB.NET

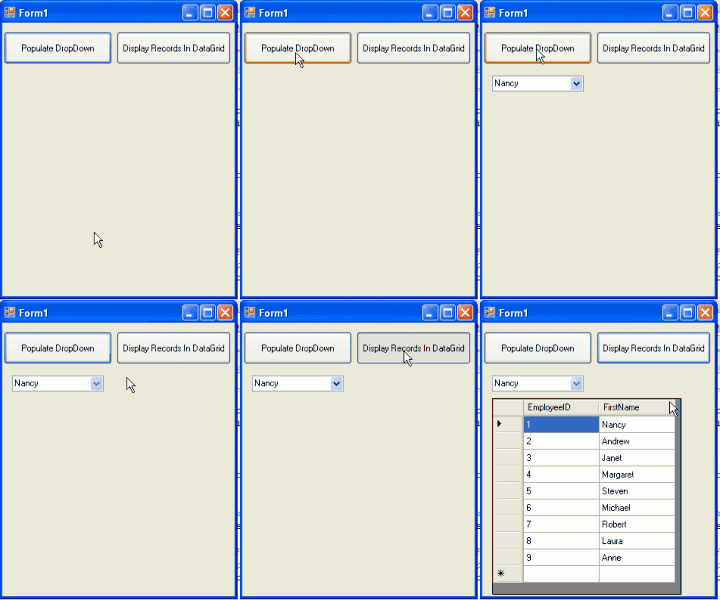
Add controls dynamically In winforms Or windows froms Using C# And VB.NET

In this post i'm going to explain how to add controls dynamically in winforms and windows forms using C# and VB.NET.

Add Controls Dynamically in Winforms

For this i have used northwind database and Employees table to populate combobox and dataGridView.

First of all place two buttons on the form to add combobox and datagridview on button click and write below mentioned code in click event on each button respectively.


C# Code

01private void btnDropDown_Click(object sender, EventArgs e)
02        {
03            int x = 13, y = 70;
04            ComboBox cmbDynamic = new ComboBox();
05            cmbDynamic.Location = new System.Drawing.Point(x, y);
06            cmbDynamic.Name = "cmbDyn";
07            cmbDynamic.DisplayMember = "FirstName";
08            cmbDynamic.ValueMember = "EmployeeID";
09            cmbDynamic.DataSource = employeesBindingSource;
10            Controls.Add(cmbDynamic);
11 
12 
13        }

Here X and Y co-ordinates are used to define at which location the control needs to be placed.

01private void btnDataGrid_Click(object sender, EventArgs e)
02        {
03            int x = 13, y = 100;
04            DataGridView gvDynamic = new DataGridView();
05            gvDynamic.Location = new System.Drawing.Point(x, y);
06            gvDynamic.Name = "gvDyn";
07            gvDynamic.Width = 250;
08            gvDynamic.Height = 260;
09            gvDynamic.DataSource = employeesBindingSource;
10            Controls.Add(gvDynamic);
11        }

VB.NET Code

01Private Sub btnDropDown_Click(sender As Object, e As EventArgs)
02 Dim x As Integer = 13, y As Integer = 70
03 Dim cmbDynamic As New ComboBox()
04 cmbDynamic.Location = New System.Drawing.Point(x, y)
05 cmbDynamic.Name = "cmbDyn"
06 cmbDynamic.DisplayMember = "FirstName"
07 cmbDynamic.ValueMember = "EmployeeID"
08 cmbDynamic.DataSource = employeesBindingSource
09 Controls.Add(cmbDynamic)
10 
11 
12End Sub

01Private Sub btnDataGrid_Click(sender As Object, e As EventArgs)
02 Dim x As Integer = 13, y As Integer = 100
03 Dim gvDynamic As New DataGridView()
04 gvDynamic.Location = New System.Drawing.Point(x, y)
05 gvDynamic.Name = "gvDyn"
06 gvDynamic.Width = 250
07 gvDynamic.Height = 260
08 gvDynamic.DataSource = employeesBindingSource
09 Controls.Add(gvDynamic)
10End Sub


Build and run the code.

Print DataGridView In WinForms C# VB.NET

Printing DataGridView With C# VB.NET In Winforms Windows Froms Application Using PrintDocument class.

Print Datagridview in winforms windows application using C# and vb.net
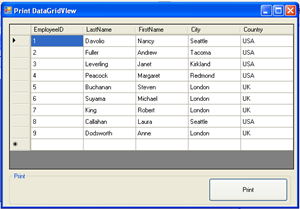
Drag and place DataGridView on the form and populate it from database or dataset. I have used northwind.

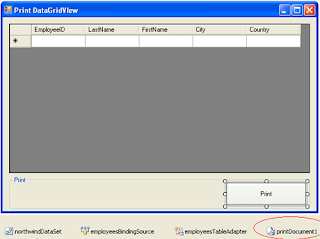
Place one button and name it btnPrint, generate it's click event by double clicking on it We will use this event for printing.

Put PrintDocument control from toolbox under printing tab, Double click on it to generate it's PrintPage event.


Printing Datagridview in C# vb.NET

Write below mentioned code in respective events.

C# CODE
01private void btnPrint_Click(object sender, EventArgs e)
02        {
03            printDocument1.Print();
04        }
05 
06        private void printDocument1_PrintPage(object sender, System.Drawing.Printing.PrintPageEventArgs e)
07        {
08            Bitmap dataGridViewImage = new Bitmap(this.dataGridView1.Width, this.dataGridView1.Height);
09            dataGridView1.DrawToBitmap(dataGridViewImage, new Rectangle(0, 0, this.dataGridView1.Width, this.dataGridView1.Height));
10            e.Graphics.DrawImage(dataGridViewImage, 0, 0);
11        }        }

VB.NET CODE
1Private Sub btnPrint_Click(sender As Object, e As EventArgs)
2 printDocument1.Print()
3End Sub
4 
5Private Sub printDocument1_PrintPage(sender As Object, e As System.Drawing.Printing.PrintPageEventArgs)
6 Dim dataGridViewImage As New Bitmap(Me.dataGridView1.Width, Me.dataGridView1.Height)
7 dataGridView1.DrawToBitmap(dataGridViewImage, New Rectangle(0, 0, Me.dataGridView1.Width, Me.dataGridView1.Height))
8 e.Graphics.DrawImage(dataGridViewImage, 0, 0)
9End Sub

Build and run the code.

PrintPreviewDialog In Windows Forms DataGridView C# VB.NET

PrintPreviewDialog Control With DataGridView In Winforms Or Windows Forms Application Using C# And Vb.net

Printpreviewdialog in winforms windows forms datagridview C# vb.Net


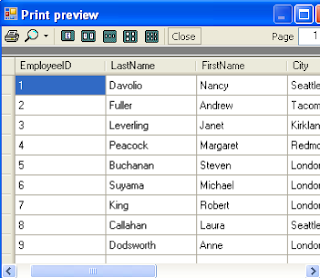
In this post i'm explaining how to use printpreviewdialog with C# and vb.net to preview before printing datagridview in windows forms application.

Drag and place one printPreviewDialog control on the page, open it's property window and assign document to be previewed (printdocument1) to it's document property or assign it in code behind.

you can go to link mentioned above to know how to create printdocument.


C# CODE
01private void btnPrint_Click(object sender, EventArgs e)
02        {
03            //Assign printPreviewDialog properties
04            pvDialog.Document = printDocument1;
05            pvDialog.PrintPreviewControl.Zoom = 1;
06            pvDialog.ShowDialog();
07        }
08 
09        private void printDocument1_PrintPage(object sender, System.Drawing.Printing.PrintPageEventArgs e)
10        {
11            Bitmap dataGridViewImage = new Bitmap(this.dataGridView1.Width, this.dataGridView1.Height);
12            dataGridView1.DrawToBitmap(dataGridViewImage, new Rectangle(0, 0, this.dataGridView1.Width, this.dataGridView1.Height));
13            e.Graphics.DrawImage(dataGridViewImage, 0, 0);
14        }

VB.NET CODE
01Private Sub btnPrint_Click(sender As Object, e As EventArgs)
02 pvDialog.Document = printDocument1
03 pvDialog.PrintPreviewControl.Zoom = 1
04 pvDialog.ShowDialog()
05End Sub
06 
07Private Sub printDocument1_PrintPage(sender As Object, e As System.Drawing.Printing.PrintPageEventArgs)
08 Dim dataGridViewImage As New Bitmap(Me.dataGridView1.Width, Me.dataGridView1.Height)
09 dataGridView1.DrawToBitmap(dataGridViewImage, New Rectangle(0, 0, Me.dataGridView1.Width, Me.dataGridView1.Height))
10 e.Graphics.DrawImage(dataGridViewImage, 0, 0)
11End Sub

Build and run the code

Download Sample Code

PageSetupDialog In C# VB.NET Windows Forms Application

This Example explains how to use PageSetupDialog In C# VB.NET Windows Forms Winforms Application to display page setup dialog and Print DataGridView.

PageSetupDialog In C# VB.NET Windows Forms Application

DataGridView is populated with Sql database.

Generate Click event of button by double clicking on it in design view and write below mentioned code to open page setup and create bitmap image of data to print.


C# CODE
01private void btnPrint_Click(object sender, EventArgs e)
02        {
03            PrintDocument printDocument1 = new PrintDocument();
04            printDocument1.PrintPage += new PrintPageEventHandler(this.printDocument1_PrintPage);
05            PageSetupDialog pageSetup = new PageSetupDialog();
06            pageSetup.Document = printDocument1;
07            pageSetup.PageSettings = printDocument1.DefaultPageSettings;
08 
09            if (pageSetup.ShowDialog() == DialogResult.OK)
10            {
11                printDocument1.DefaultPageSettings = pageSetup.PageSettings;
12                printDocument1.Print();
13            }
14         }
15 
16        private void printDocument1_PrintPage(object sender, PrintPageEventArgs e)
17        {
18            Bitmap dataGridViewImage = new Bitmap(this.dataGridView1.Width, this.dataGridView1.Height);
19            dataGridView1.DrawToBitmap(dataGridViewImage, new Rectangle(0, 0, this.dataGridView1.Width, this.dataGridView1.Height));
20            e.Graphics.DrawImage(dataGridViewImage, 0, 0);
21        }

VB.NET CODE
01Private Sub btnPrint_Click(sender As Object, e As EventArgs)
02 Dim printDocument1 As New PrintDocument()
03 printDocument1.PrintPage += New PrintPageEventHandler(AddressOf Me.printDocument1_PrintPage)
04 Dim pageSetup As New PageSetupDialog()
05 pageSetup.Document = printDocument1
06 pageSetup.PageSettings = printDocument1.DefaultPageSettings
07 
08 If pageSetup.ShowDialog() = DialogResult.OK Then
09  printDocument1.DefaultPageSettings = pageSetup.PageSettings
10  printDocument1.Print()
11 End If
12End Sub
13 
14Private Sub printDocument1_PrintPage(sender As Object, e As PrintPageEventArgs)
15 Dim dataGridViewImage As New Bitmap(Me.dataGridView1.Width, Me.dataGridView1.Height)
16 dataGridView1.DrawToBitmap(dataGridViewImage, New Rectangle(0, 0, Me.dataGridView1.Width, Me.dataGridView1.Height))
17 e.Graphics.DrawImage(dataGridViewImage, 0, 0)
18End Sub

Build and run the application.

Download Sample Code

ErrorProvider In WinForms And Windows Forms

ErrorProvider In WinForms or Windows Forms application using C# and VB.NET

In this post i am going to describe how to use error provider control in winforms or windows forms application using C# and VB.NET.

ErrorProvider in winforms and windows forms applications
I am using error provider control to display warning or tick icon depending on data entered in textbox so that user can find out text entered is correct or incorrect.

in first textbox i am just checking whether it's empty or not.

Second textbox is numeric only, user can enter only numbers in this and if anything other than number is entered, error provider will show warning icon beside textbox with tooltip containing suggestion.
I have used regular expression to check textbox text for numbers.


For this i have created a simple winform application with 2 textbox on windows forms. follow steps mentioned below for this example.

1. Create new windows application in visual studio.

2. On the form place 2 textbox and 2 errorprovider control from toolbox.

I m using 2 errorproviders, one to display warning icon and other to displat tick or success icon.


Add this namespace in code behind of form to use regex.
1using System.Text.RegularExpressions;

now generate Validated or Validating event for both textboxes by opening property windows of textbox and clicking on lightning icon (Events) at the top of window. from there scroll to bottom and double click on validating. it will generate validating event for textbox in code behind.

Write code mentioned below in events generated.

C# code

01private void textBox1_Validating(object sender, CancelEventArgs e)  
02        {
03            if (textBox1.Text == string.Empty)
04            {
05                errorProvider1.SetError(textBox1, "Please Enter Name");
06                errorProvider2.SetError(textBox1, "");
07            }
08            else
09            {
10                errorProvider1.SetError(textBox1, "");
11                errorProvider2.SetError(textBox1, "correct");
12            }
13        }
14 
15        private void textBox2_Validated(object sender, EventArgs e)
16            {
17            if (textBox2.Text == string.Empty)
18            {
19                errorProvider1.SetError(textBox2, "please enter age");
20                errorProvider2.SetError(textBox2, "");
21            }
22            else
23            {
24                Regex NumericOnly;
25                NumericOnly = new Regex(@"^([0-9]*|\d*)$");
26                if (NumericOnly.IsMatch(textBox2.Text))
27                {
28                    errorProvider1.SetError(textBox2, "");
29                    errorProvider2.SetError(textBox2, "correct");
30                }
31                else
32                {
33                    errorProvider1.SetError(textBox2, "Please Enter only numbers");
34                    errorProvider2.SetError(textBox2, "");
35                }
36            }
37        }

VB.NET Code

01Private Sub textBox1_Validating(sender As Object, e As CancelEventArgs)
02 If textBox1.Text = String.Empty Then
03  errorProvider1.SetError(textBox1, "Please Enter Name")
04  errorProvider2.SetError(textBox1, "")
05 Else
06  errorProvider1.SetError(textBox1, "")
07  errorProvider2.SetError(textBox1, "correct")
08 End If
09End Sub
10 
11Private Sub textBox2_Validated(sender As Object, e As EventArgs)
12 If textBox2.Text = String.Empty Then
13  errorProvider1.SetError(textBox2, "please enter age")
14  errorProvider2.SetError(textBox2, "")
15 Else
16  Dim NumericOnly As Regex
17  NumericOnly = New Regex("^([0-9]*|\d*)$")
18  If NumericOnly.IsMatch(textBox2.Text) Then
19   errorProvider1.SetError(textBox2, "")
20   errorProvider2.SetError(textBox2, "correct")
21  Else
22   errorProvider1.SetError(textBox2, "Please Enter only numbers")
23   errorProvider2.SetError(textBox2, "")
24  End If
25 End If
26End Sub

Build and run the application.


Download Sample Code